Hello Friends,
If you have come to this page so that means you are Java enthusiast and looking forward to learn Java. Let me tell you Java is very easy to learn, if you learn some core concepts well.
Step 1 : Let us install Eclipse(copying actually) on machine if it is not there already. Eclipse can be installed from
http://www.eclipse.org/downloads/
I downloaded Eclipse Luna for my 32 bit machine.
Step 2 : Install Java/JDK 1.6 from Oracle site.
http://www.oracle.com/technetwork/java/javase/downloads/java-archive-downloads-javase6-419409.html#jdk-6u45-oth-JPR
If you don't know steps required to install Java/JDK, please go through tutorial How to Install Java/JDK on your windows machine
Step 3 : Open eclipse by double clicking on eclipse.exe in eclipse folder that you have downloaded in step 1.
Note : For quickly opening eclipse in future, you can right click on eclipse.exe and select
1)Pin to Start Menu
2) Send to Desktop(create shortcut).
Step 4 : Right Click in the project explorer and select New ->Project and in the wizard type java project and select Java project and click on Next.
Step 5 : Type the Project Name which you want to give to your new project. Here it is FirstJavaPrpgram. Click Next ,then finish and then Yes.
This is how eclipse will find JRE(Java runtime environment):
First it will check for JRE in eclipse folder itself i.e at eclipse/jre/bin/javaw.exe
If it could not find it there then it will look in eclipse.ini for location of JRE.
and if there is no such entry in eclipse.ini, then it will look for your System's PATH variable.
You can add following in eclipse.ini
-vm
<Path where you have JRE on your system>/bin/javaw.exe
But you have to make sure that above two lines are mentioned before -vmargs
So after adding above two lines your eclipse.ini will look like as below :
-startup
plugins/org.eclipse.equinox.launcher_1.3.0.v20140415-2008.jar
--launcher.library
plugins/org.eclipse.equinox.launcher.win32.win32.x86_1.1.200.v20150204-1316
-product
org.eclipse.epp.package.jee.product
--launcher.defaultAction
openFile
--launcher.XXMaxPermSize
256M
-showsplash
org.eclipse.platform
--launcher.XXMaxPermSize
256m
--launcher.defaultAction
openFile
--launcher.appendVmargs
-vm
<Path where you have Jre on your system>/bin/javaw.exe
-vmargs
-Dosgi.requiredJavaVersion=1.6
-Xms40m
-Xmx512m
Actually eclipse will check for JRE when you will launch(open) the eclipse. So make sure that either you have JRE inside eclipse or if not then mention path in eclipse.ini.
Step 6 : You will see newly created project in workspace as follow
Step 7 : To keep related classes together and to avoid ambiguity in class names, we create packages. So now create a package inside source folder which is src folder as follows. This is a folder where all your source java code will go.
Step 9 : Edit Class and add following code : System.out.println("Yeppeee...Here is My First java Program");
Here System is a final class which is already defined in the rt.jar provided as a part of JRE library and which is already there on the build path of your project.
out is reference of PrintStream class and println() is a method in PrintStream class,which writes output to console.
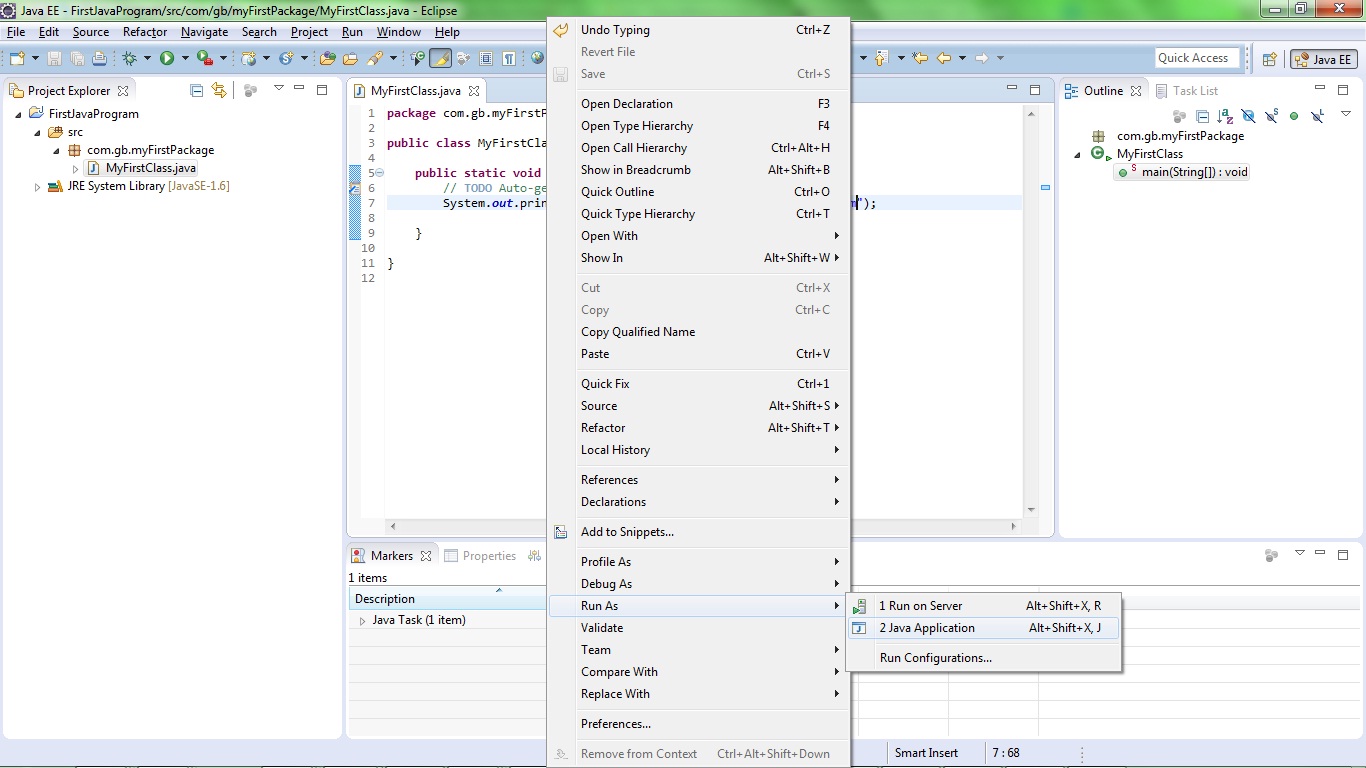
Step 10 : Run this class by right clicking on it and then Run as ->Java Application as follows
Step 11 : Now is the time to check the output of the program.So whatever you have written in System.out.println() will be printed on the console as follows
Any feedback ,suggestions ,questions on the post are welcome.


